Tags in Palo Alto Networks firewalls are used to organize and categorize configuration objects such as address objects, address groups, zones, services, service groups, and security policies. Tags help simplify administration and make policies easier to manage and identify.
Creating a New Tag in Palo Alto Networks Firewall (GUI)
Step 1: Log In to the Firewall
- Open a web browser.
- Enter the firewall’s management IP address in the address bar.
- Log in using your administrator username and password.
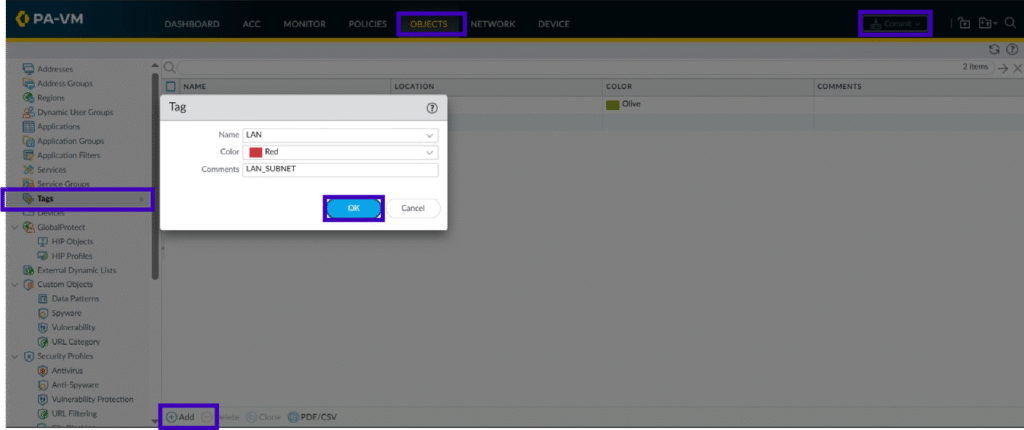
Step 2: Navigate to the Tags Page
- From the top navigation menu, click Objects.
- In the left navigation pane, select Tags.
Step 3: Add a New Tag
- Click Add at the bottom of the Tags page.
- The Tag configuration window opens.
Step 4: Enter Tag Details
- Provide the required information:
- Name: Enter a descriptive name for the tag (for example, LAN).
- Color (Optional): Select a color to visually identify the tag.
- Comments (Optional): Add notes or a description for the tag.
Step 5: Save the Tag
- Click OK to save the tag configuration.
Step 6: Commit the Configuration
- Click Commit in the upper-right corner of the web interface.
- Review the pending changes.
- Click Commit to apply the configuration to the firewall.
Creating a New Tag in Palo Alto Networks Firewall (CLI)
Create a Tag
configure
set tag Production color color1 comments Production Servers
commit

Available Colors
color1 = Red
color2 = Green
color3 = Blue
color4 = Yellow
color5 = Copper
color6 = Orange
color7 = Purple
color8 = Gray
color9 = Light Green
color10 = Cyan
color11 = Light Gray
color12 = Blue Gray
color13 = Lime
color14 = Black
color15 = Gold
color16 = Brown
color17 = Olive
color18 = Maroon
color19 = Red-Orange
color20 = Yellow-Orange
color21 = Forest Green
color22 = Turquoise Blue
color23 = Azure Blue
color24 = Cerulean Blue
color25 = Midnight Blue
color26 = Medium Blue
color27 = Cobalt Blue
color28 = Violet Blue
color29 = Blue Violet
color30 = Medium Violet
color31 = Medium Rose
color32 = Lavender
color33 = Orchid
color34 = Thistle
color35 = Peach
color36 = Salmon
color37 = Magenta
color38 = Red Violet
color39 = Mahogany
color40 = Burnt Sienna
color41 = Chestnut
color42 = Scarlet Red
Step 2: Apply Tags to Address Objects
GUI
Navigate to Objects > Addresses
Create a new address object or edit an existing one
Under the Tags section:
Click Add
Select the tag created earlier
Click OK
Commit the configuration
Step 3: Apply Tags to Address Groups
GUI
Navigate to Objects > Address Groups
Create or edit an Address Group
Under Tags, click Add
Select the required tag
Click OK
Commit the changes
Step 4: Apply Tags to Security Policies
GUI
Navigate to Policies > Security
Edit an existing security rule
Open the Actions tab
Under Tags, click Add
Select the desired tag
Click OK
Commit the configuration
Leave a Reply